Knowledge Base
Setting Up Windows XP Mode on Windows 7 Enabled Systems
Updated: October 2, 2017
To enable Windows XP Mode on systems with Windows 7, please follow these steps. First you will need to create a new virtual machine. From the start menu, click to browse All Programs, then hover over Windows Virtual PC. When the folder expands, click Windows Virtual PC.

After the Windows Virtual PC window opens, click the button Create Virtual Machine. The default options should be used.


When prompted to specify memory and network settings, ensure the options chosen match the image below.

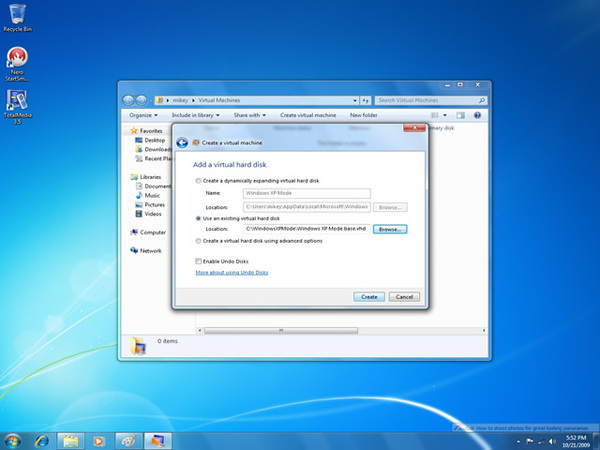
When prompted to choose Virtual Hard Disk settings, choose Use an existing virtual hard disk. The VHD will be located at C:\WindowsXPMode\Windows XP Mode base.vhd. Then press Create.

From the start menu, click to browse All Programs, then hover over Windows Virtual PC. When the folder expands, click Windows XP Mode. This will begin the setup of Windows XP Mode. Work through the prompts to complete the process.


Once the setup of Windows XP Mode is completed, you will be presented with the Window below. Before installing programs on the Windows XP Virtual PC, click the Start Menu and highlight My Computer. Then Right-Click and choose Manage. When the Computer Management window appears, on the left pane expand System Tools, then Local Users and Groups, and highlight the option Users. On the right pane, highlight XPMUser and choose Properties. When the XPMUser properties window appears, uncheck the box next to Account is disabled and click OK.


With XPMUser still highlighted, Right-Click and choose &'Set Password.&' Create a password for the XPMUser account, then click &'OK&'.

Move your cursor to the menu for the Virtual PC and click on Tools, than Enable Integration Features. You will be prompted for your user name (XPMUser) and password. Complete this information and check the box Remember Credentials. Then click OK.


Now click on Tools again and choose Settings. Highlight the setting Close and choose to Hibernate when closing the Virtual Machine. Then press OK. Windows XP Mode may now be used as if it were an actual Windows XP PC. Be sure to install anti-virus software and the latest Windows Updates. Exit the Virtual PC at any time by choosing Log Off XPMUser in the Start Menu.


If you experience slow performance when trying to access a shared drive from the host PC within the virtual machine, download the attached hotfix and run it within your Windows XP Virtual Machine. WindowsXP-KB972435-x86-ENU improves slow performance when trying to open a redirected drive on a remote computer that is running Windows XP through a Terminal Services session; more information can be found here.